Wednesday, November 19, 2008

More Shaped Bokeh

I noticed once I had the pictures on the computer that his eye was OOF. I guess that's the bad thing about using such a big aperture. I'll try this again, just wanted to post some more.

The punches I used are about the same size as a dime. Or about 1.5 cm across.
I tried the horseshoe shape just now. I wasn't sure how a shape like that would work. So as long as the sizing is right it should work.
I am wondering how everyone is doing with this.

Monday, November 17, 2008

Bokeh Baby!

**EDIT**
* You will need to give yourself some distance between you and your light source.
* If you do not have a big aperture you will need to use a smaller hole.

------------------------------------

Let's start on the pronunciation, shall we?

Bokeh is like "you say potato, I say potato, potato, potato" , "you say tomato, I say tomato, tomato, tomato, let's call the whole thing off ". I pronounce bokeh to rhyme with mocha, and I don't even drink coffee! So, maybe you pronounce it bo-kay, and that's okay, let's just get some bokeh!!!

Bokeh refers to the blurring of the background when you have a shallow depth of field. And we all know what DOF or depth of field is, right? Good I thought so, and if not just take a peek back at Cy's post here.

Personally, when I think of bokeh I don't just think of DOF, I think of what is happening with the lighting in the background. Leaves in the sunlight will often produce some great bokeh. In this next shot there is some bokeh going on in the back (hard to see with that punk that is goofing off, I know).


But what I really wanted to focus on today was getting SHAPED bokeh. Are you in? Here is a string of Christmas lights on the floor. Using manual focus I focused on the lights. Wow, spectacular isn't it! Just kidding, just looks like a tangled mess ready to happen. But now look at what happens when I manually move my focus away from the lights and closer to me....


Pretty cool, huh? Now that you get what I'm doing here let's start taking it a little further.


Ahhhhh, heart bokeh.


Some ordinary looking candles but look what happens when I turn off the lights and I try to get a shaped bokeh to appear for me.......


A-ha! Heart bokeh!

And here is how you are going to get it....


You'll need to use your biggest aperture (smallest F-stop) for this. I used my 50mm lens which has a f-stop of 1.8. If you don't have this you may need to just play around with the size of the hole you are working with.

Start by tracing around your lens on a black piece of paper. Cut that out and then to make it easier to use with your punch/hole or use with multiple shapes cut another section out of that circle.

And with another small piece of paper cut or punch out your shape. Tape it onto the large circle and wah-lah....


If you decide to give this a try, please submit your pictures so we can see what you came up with.

If you are not part of this group and want to give this a try, let me know by leaving a comment and we can get your pictures up here too!

Have fun with your bokeh.

Tuesday, November 11, 2008

Can you say confused?


I am having a hard time getting this last example. I love what Mazz did but I am having a hard time figuring it out. I cheated on the above picture and didn't do it Mazz's way. I cut out the boy and added the background and then I lowered the opacity of the background paper. I don't seem to be able to find a blending mode. Is it right in front of my face and I just don't see it? Is it because I am only using Elements and not the full version? Is it because I need Photoshop for Dummies? I am frustrated because I generally get these things but I'm not getting this last tutorial. Do I need to dump the money in and get CS4?


All help is appreciated. Seriously... HELP!

Monday, November 10, 2008

Just Playing Around

Well, I had a little fun with this picture; never did really like the background of the image so putting the lesson to the test and this was what I ended up with...

Rock Out Your Photos

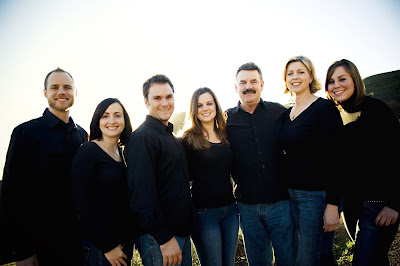
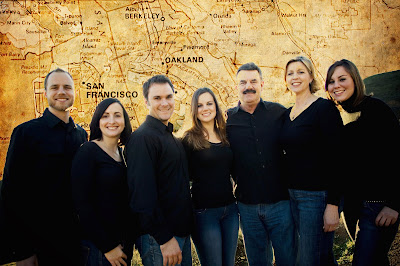
Would you like your photos to look like they are ready for Rolling Stone magazine? Here are a few options to look into. When putting this assignment together for my class, I am teaching Intro to Computer Art 2201 at Seattle Pacific University, I told them to pretend that they have be asked by a client to take their family photos and add some "edge" to them (clients are always asking for edgy design).

Step One: Pick your photo


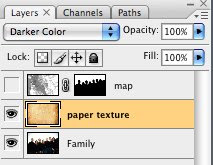
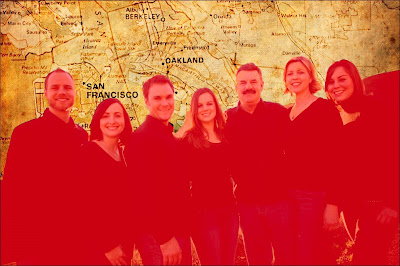
Step Two: Pick a texture. In my case I choose some yellowed paper. It is best to scan it in or take the photo yourself of a texture like cracked clay, a weathered bar door, etc.


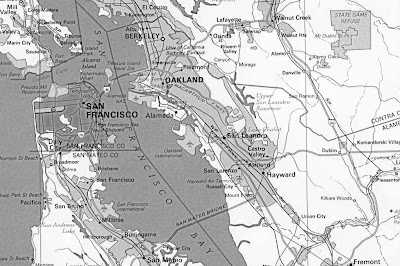
Step Three: Pick your second texture. I love maps and text so I found a map of the Bay Area.


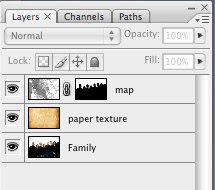
Step Four: You will apply a blending mode to the layer. I choose Darker Color. I then realized it made my subjects have yellow teeth so I lightly erase that area on the face, but making sure I was on the texture layer.


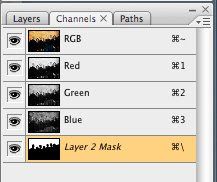
Step Five: You will now want to create a mask around your photo subject. Use the Lasso tool. Then add it in the channel tab. This will allow you to mask the map layer so that it does not cover of your subjects. Apply the mask to your map layer by clicking on the mask icon at the bottom of the layers palette. You can also apply a blending mode to your layer. I choose to use color burn.


Step 6: Stand back and look at how you have rocked out your photo.


You can follow my design company, Mazzarello Media and Arts on our blog, mazzarellomedia.blogspot.com or my computer class at mazz2201.blogspot.com.

Monday, November 3, 2008

White Balance Insights by Oysterblogger

I took this picture about six weeks ago.
Location: In my Father in Laws car with the door ajar.
Weather: A bit cloudy
Problem: it is way too blue and I didn't have enough light 
ISO 200 
f/stop 5.6
shutter speed 1/125
I was still getting to know my manual settings and I still am, 
but luckily if you do have bridge that comes with the Adobe Creative Suites
you can open the photo in Bridge
File-Camera Raw Preferences-then use the White balance pop out menu and change it to


SHADY
or Lightroom 1.0 or 2.0
Develop-White Balance (pop down m
enu) then Shady


SHADY since she was inside the car and the light in the car was like Shade condition.
 

If you just have photoshop and no Creative Suite you can fix the blue with Auto Color.
But it is not as nice and warm as changing the White Balance.
You can compensate by messing around with the tones...

This last picture is my final unless I decide to burn my older son out of the top
left corner.  I liked the look of the three of them but then he sort of seems like a distraction.
Since I am still working on my manual Photography I do use PS to enhance
Here I gave it more blacks and I used the healing tool for some wrinkles.
I also added a a few layers to smooth it out.
(that is a whole other post!)
As you can see the final product looks much nicer but much of the change was my change in the White Balance.
The only reason the picture turned out so blue was because I forgot to do adjust
the White Balance inside the camera menu before I started shooting and it must have been on SUNNY.  I learned this in my photo class that I took.
I am obviously still really behind I shooting my images straight out of the camera this good but I am working on it.  If you want to see some of my more recent photos that were almost Straight Out of the Camera with less adjustments look here
Let me know if you think I should burn out my older son I am curious what the eyes of others would say to this visual question?
As you can see I do not know all the hard and fast rules of composition YET
for now I just use my eye to see what I like and what I don't.

Saturday, November 1, 2008

Clouds


I just wanted to share the sight I saw today. Unbelievable cloud formations. I thought you all might like to see them too! I've never seen any quite like them. I just happened to have my camera along with and got several cool shots..(I edited my original post as it wasn't written plainly!)
Posted by Picasa