Saturday, February 28, 2009

reflection above~

So this picture was a total experiment. I was board out of my mind - and we were sitting along side the road, my hubby was on the phone and we'd already been there closer to two hours. Just to have a phone conversation. Obviously it is a windshield the hat is reflecting off of.Now to get more of a crisp intention look, I selected the hat using the quick selection tool. I love the refine edges option - once you have most or just what you don't want to be adjusted selected, lets move on to our repair. Up in the categories at the top of you photo shop window hit select, go down to inverse (4th down on my photo shop) Use the eye dropper tool, to select a color from your photo which you wish to make your corrections with. Now, working with the paint brush tool -soft round 200 pxl- paint or spray over areas you wish to be less obvious in you new reflection.
Sorry this is so Late!

Wednesday, February 18, 2009

How I did it


I had wanted to get the information up sooner on how to create this.... something about a house full of boys slows me down sometimes.
So... here we go!
-
I have a candle set on the table. One with a nice large wick works best, giving a longer time to take pictures before the smoke blows out. Side Note: I'm going to town tomorrow to find an incense stick to see it's results.
-
I did this at night with the lights off. On the side place a light, desk lamp, flashlight, just some sort of light source to illuminate the smoke. Behind the candle place something black. I happened to have a large sheet of black board. Maybe you have a dark blanket, a skirt, just something black for a background.
-
I used my 50mm lens. I used all manual settings.
ISO 400
Shutter 1/80
f/2.2
WB Auto
-
I realize not everyone has a big aperture like the one I used. Just get creative with you settings and maybe get more light on your smoke to help you out with that.
-
Do NOT use a flash. I thought I would try it and it illuminates the background too much.
-
Set you focus to Manual Focus. Focus on the area to have it ready. Nothing like taking out of focus pictures.... *points at self*
-
Once you have your pictures it's time to edit.
-
First thing I did was go to levels and bring in each level to the middle, lightening the lights and darkening the background.
-
Now click back on your background picture. Duplicate it by pressing Ctrl J. Then change the blending mode to Overlay
-
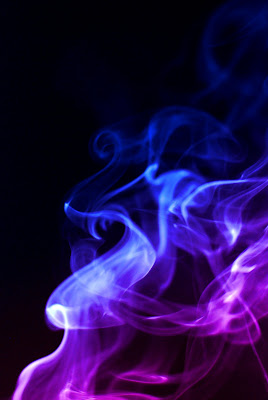
Now click on your Gradient Tool. Next choose your foreground and background colors to what you would like.
-
Go to your picture and drag the Gradient Tool in whichever way you want the colors to go. I know, clear as mud. Just experiment with the colors at this point.
-
Please let me know if this isn't clear enough and I will try to clear anything up for you.
-
NOW GO TRY IT!!!!!!!

Tuesday, February 17, 2009

Colored Smoke

I was excited to get working on this challenge. What I have here was just some playing around with a candle and I would just blow the candle out. I had a black background and did not use a flash for these. I want to try some more techniques as well in the next few days. I hope some of you will give this a try and post what you come up with.


Wednesday, February 11, 2009

Time Extension

HI ALL!

Thanks Judi for your recent fire post, I think a lot feel how I do - ready for a campfire and s'mores! Mmm.

I thought it would be a good idea to stretch out the time in between posts to give more time to learn the tutorial or take pictures for a challenge.

As always feel free to post something if you have a question!

Tuesday, February 10, 2009

Fire


Hi everyone. I guess I'll plunge in with my fire photo. It isn't anything extraordinaire so I'll be anxious to see everyone elses. I took this one with a flash and played some with it in Photo Elements where I cropped it and increased saturation some and probably darkened the shadows too.

Sunday, February 8, 2009

On FIRE!

For my post I wanted to create a type of challenge if you are up for it.

I have been wanting to take pictures of fire, flame, and or smoke. It is something that easily can be done in your home with a match, candle, etc. I have been wanting to capture smoke but I may give flame a try. Submit your photos, can't wait to see what we come up with.

***

I see the last 2 contributors missed their posts, that is no problem but I wonder if anyone would like to make posts in two week intervals instead of one. Would that give more time?

Up next is Wrena, then Cy. Be sure to check the side of the screen for your date often. Thanks!

Sunday, January 25, 2009

Cataloging Photos

I Have Adobe CS3 and Lightroom 2.  I prefer to load my photos through Lightroom, but I could use Bridge.  I just would like to know if anyone out there is good at organizing and cataloging their photos, or even just medicore.    Do you rate your photos or have any other tips to being a more efficient photographer on the backside.

Any tips would be enlightening!!
Thanks!

Friday, January 23, 2009

Hey everyone/anyone! Help! Can you tell me how to add a 'Layer Mask' in Elements 6? Thanks!

Monday, January 19, 2009

Black & White Portrait

I sure don't feel like I should be giving a tutorial as I am such a novice. But for what it is worth, I'll give it my best shot. The above photo is SOOC. I'm a huge fan of black and white and have had lots of fun playing with photos in Photo Elements 6. Learning it has at times been extremely frustrating to me and there is a ton about it that I have yet to learn. BUT, it is so rewarding when you finally do figure out a technique.


To get this effect I first cropped the pix. Then, I put it into black and white by clicking on the 'Enhance' tab and then 'Convert to Black and White'. Often I will go back into the Enhance tab, click on 'Adjust Lighting', click on 'Levels' and move the black arrow in 'Input Levels' to the right until I get the desired intensity of black that I want. That feature is way cool and I love using it. Next I did Vignetting. I have had to go back OFTEN to Carin's excellent tutorial on 'Vignetting' which is in the 2008 archives and dated October 6th. I found out you can use all kinds of colors with awesome effects to frame your subject with. Anyway, I'm sure this is all elementary to you, but hopefully helpful to someone who is learning the beginning basics like I am! Have a great week everyone!

Saturday, January 17, 2009

Midnight Truck


The image is quite dark, which means there isn't much there to work with. I put the image in Photoshop CS3 and bumped the shadow about 75%. Here is the result. Let me know what you think

Cy

Friday, January 16, 2009

Another 'Help' one!


I took some pix's of my son's truck and trailer around midnite when he was passing through. I took them at the weigh scale under their lites and got some rather cool pix's. I blew them up to a 5"x7" and was disappointed when they turned out way to dark. Anyone have any helpful hints of what to do with them? I'd love to do some for his birthday.

Monday, January 12, 2009

Help!!


I love this picture and would like suggestions to make it the best possible... I was busy and quickly took shots when not otherwise involved... (it was a 50th anniv. for my sister.) The kids are so cute and would like to see the picture improved. You can see on the second picture that I tried working with it but it made it look faded and a bit washed out.

A quick setting change can make a difference

Hey There Folks.  I wanted to share with you what a difference a little setting change can make.
I am in the habit of altering my photos in photoshop, but as I learn more magic with the camera, lighting a shoot I am slowly having to edit less and coming up with a better quality
SOOC Straight Out Of Camera Shot.
These are SOOC shots and I am quite proud of them.
I set the white balance for cloudy as it was cloudy that day.
Then I went into the camera menu settings and changed colors to VIVID.  Look at the wonderful effect that I got, and without my crutch (Photoshop)!