Here is a quick tutorial on using the Gradient Fill tools...
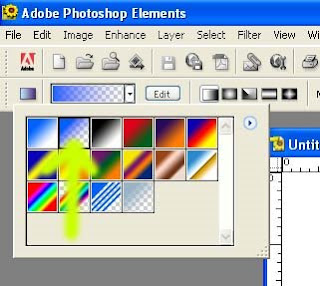
We are going to start with the simple Linear Gradient Tool and learn a couple of things. First of all, there are many different gradients that can be made, as shown in the graphic below of the drop down gradient options. We can make a two color gradient, a single color to transparent gradient, multicolor gradients, etc. Lets concentrate on the single color gradient to transparent.
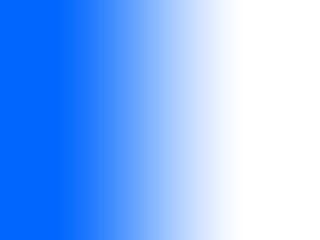
Open a new file with a white background and we will see what we can do with the gradient tool. Select the gradient tool with single color to transparent.
Now click on the left side of the image and drag across to the right side, we want a long drag mark so we have lots of transition from color to transparent.

Notice how too the left of where you clicked the color is 100% Opaque and to the right of where you stopped dragging it is 100% Transparent. The transition between the two colors (Blue and Transparent) happens linearly between the two endpoints of the drag mouse operation. The gradient change will always happen parallel with the drag line, so dragging at an angle will rotate the gradient to occur parallel to the drag line.
If the gradient doesn't come out the way you would like, just hit CTRL+Z (or undo) and try it again. The gradient tool is basically a special paint bucket that doesn't cover the entire canvas uniformly.
Now lets step it up a notch and get creative using the gradient editor. Clicking on the edit button on the Gradient toolbar will pop-up the gradient editor dialogue box. Notice down towards the bottom of the box is a sample of the gradient with some squares above and below the gradient. These boxes can be moved right and left to adjust how the gradient fill happens between the endpoints of the drag operation. So if one wants a biased transition, dragging the center small diamond with bias the gradient. The end squares change where the colors are 100%, and I find it easier to not adjust those squares since it is just as easier to control that using the mouse drag operation.
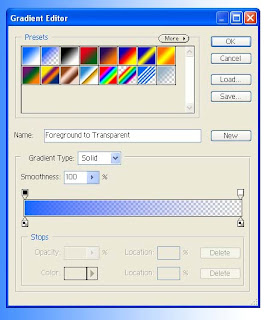
We can add a stop, or color definition point by clicking above or below the gradient sample. This will allow us to define a hard point in the gradient. This can be a color change, a certain amount of transparency or just give a little more control over how the gradient is built. The color is defined below the gradient sample, while the opacity is defined above the gradient sample.
Those are the very basic operations of the gradient tool, hopefully this helps and is not just more confusing. Still confused?
Here is another site that contains a tutorial of Gradients


